

We've all seen emulators before, and relived loved games thanks to emulators, which is great on a computer if you don't mind a mouse and keyboard. However, it is really a different experience to play a game with authentic controls, feel, and settings. Way back when the 8 and 16 bit consoles were popular, so were arcades, the universal safe haven for gamer's of all ages back then. So it would only seem fitting for all the consoles of the era to converge in an arcade style box. Originally, it seemed feasible to just plop a keyboard and mouse where the controls would go on an arcade cabinet.
The more I thought about the concept of a universal oldschool gaming box, the more I wanted it to happen. I also realized more and more, that for this to be a truly enjoyable, and be a full immersion experience, it had to have authentic arcade style controls, monitor, and sound.
This posed many more obstacles, but again, this is the purpose of this page.
Choosing a name was difficult. Originally I was calling it the "Panopto-Vision" due to my lack of imagination. I wanted the name to incorporate my own gamer name "Panopticon" and I also just felt like paying tribute to the first console I ever owned as a child, which was Mattel's Intellivision II. My friend and peer Derek gave me the name "Super Pantendo". It stuck, and for all the right reasons. Pan being a part of my own gamername, also the suffix "Pan" in Greek is attached to a word to refer to all, every, or everything.
First off, the OS
Relability and customization
The OS is Windows XP. As XP is now a decade old, it is polished and proven. It works well in low resource environments and is dependable. Also because of its age, it is easily customized. The boot screen has been replaced by this for example.

Usability
The interface HAS to be navigable from a controller, not a mouse or keyboard. This was the first obstacle. As a result of this, the interface is an overlay for MAME specially designed to work with PC gamepads. I have re-tooled and re-branded the interface to load immediately after windows finishes loading, and to look seamlessly elegant.
Making everything work (software)
Look... sure its just pressing fricking buttons, but that was quite a job lol. Each emulator is still a separate entity within the computer and has to be set up independently, while also working with MAME, and the Interface without conflicting with any of the other emulators either. This step has already been tackled.
Cramming it all together
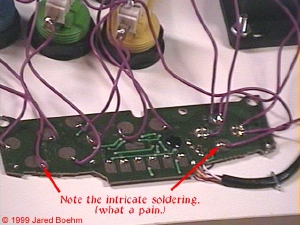
Buttons'n shit
UPDATE: Frankenstein-ing a controller is not necessary, I found a controller board that will function perfectly for this project. It is called the iPac. I got everything i needed from Ultimarc.com.The pictures below are from my original idea on how to make the controls.


Button Layout
The machine is going to have to be able to play everything between the Sega master system to the SNES and GB Advance. So the button layout is a bit tricky. I've gone through a few design concepts involving different button placement on the cabinet itself, and different mappings. I want everything to be as close to the original controllers as possible for relative location to other buttons, while also maintaining a common theme across the consoles. This is what I've got currently.
Physical Layout

Button Mappings

EDIT: Better explanation

The PLAN
 from this , to this
The Cabinet itself


Paint
My very wonderful girlfriend whom also happens to be VERY artistically talented, including with paint, has agreed to paint the cabinet. The specific design still needs to be worked out, but this step mostly relies on seeing what I have got to work with once I actually get a cabinet.
I want to really put this machine over the top in terms of technological and aesthetic awesomeness. So the idea I have is to put the words "Super" and "Pantendo" on the boarders to the right and left of the screen. Different portions of these words will light up depending on the sound created by the machine. Low notes would make the green bottom portion of the words light up, mid range sounds would be blue, and high pitch sounds would be red. The following pictures will help explain.
 Okay so first you need to understand how the sounds spectrum works. This is
a graph that shows you the level and frequency of a sound. Musicians and Technicians use these to engineer sounds.
Okay so first you need to understand how the sounds spectrum works. This is
a graph that shows you the level and frequency of a sound. Musicians and Technicians use these to engineer sounds.
My "light organ" will split up the spectrum into 3 distinct zones. These zones correspond with lights that will turn on when a sound enters these zones.

So lets say a whole ton of noise is happening, like static or a full range of sound. This would trigger all 3 colored lights to turn on, and the sides of the screen would look like this.

Or let’s say that just a bass drum hits, or a bass guitar is rocking. The EQ graph and lights would look like this.
 Here are vocals or any other main melody type of instrument, which do
tend to be in the mid-range.
Here are vocals or any other main melody type of instrument, which do
tend to be in the mid-range.
Finally, this is a high-hat or cymbals or anything else high and tinny sounding.
 And here is an example of what music might look like one second. The next
second the graph might look different and thus different lights would be on.
This way the arcade cabinet would be producing lights in accordance with the
types of sounds or music any given game would make.
And here is an example of what music might look like one second. The next
second the graph might look different and thus different lights would be on.
This way the arcade cabinet would be producing lights in accordance with the
types of sounds or music any given game would make.
Basically i'm going to achieve this using a device designed by TheLEDArtist. He does amazing work. I recommend checking his stuff out.

The final machine will look something like this. The screen cover will have the lights and graphics as discussed in the above paragraph.
TODO's
49. Build light organ
53. Create passive screen cover
54. Print graphics for screen cover
This is the section where you can really lend me a hand. Let me know if you know of better ways to do any of these steps compared to how I have done them, or plan to do them. If you know a better button layout to fit criteria, if you know a better way to make custom gamepads, please let me know!